> ## Documentation Index
> Fetch the complete documentation index at: https://moengage-unity-sdk-initialization-split.mintlify.site/llms.txt
> Use this file to discover all available pages before exploring further.

# Create Content with the Drag and Drop Editor

> Design email content visually with MoEngage's drag and drop editor. Add content blocks, customize properties, and preview in dark mode or across devices.

# Getting Started

The Drag and Drop editor is divided into two main areas: the main message editing section on the left, and the properties panel on the right. In general, you will be dragging and dropping content elements onto the stage and then editing their properties.

<Info>
  If custom fonts are enabled for your workspace, this editor's functionality changes accordingly. For more information, refer to [Custom Fonts](/user-guide/campaigns-and-channels/email/getting-started-with-email/custom-fonts).
</Info>

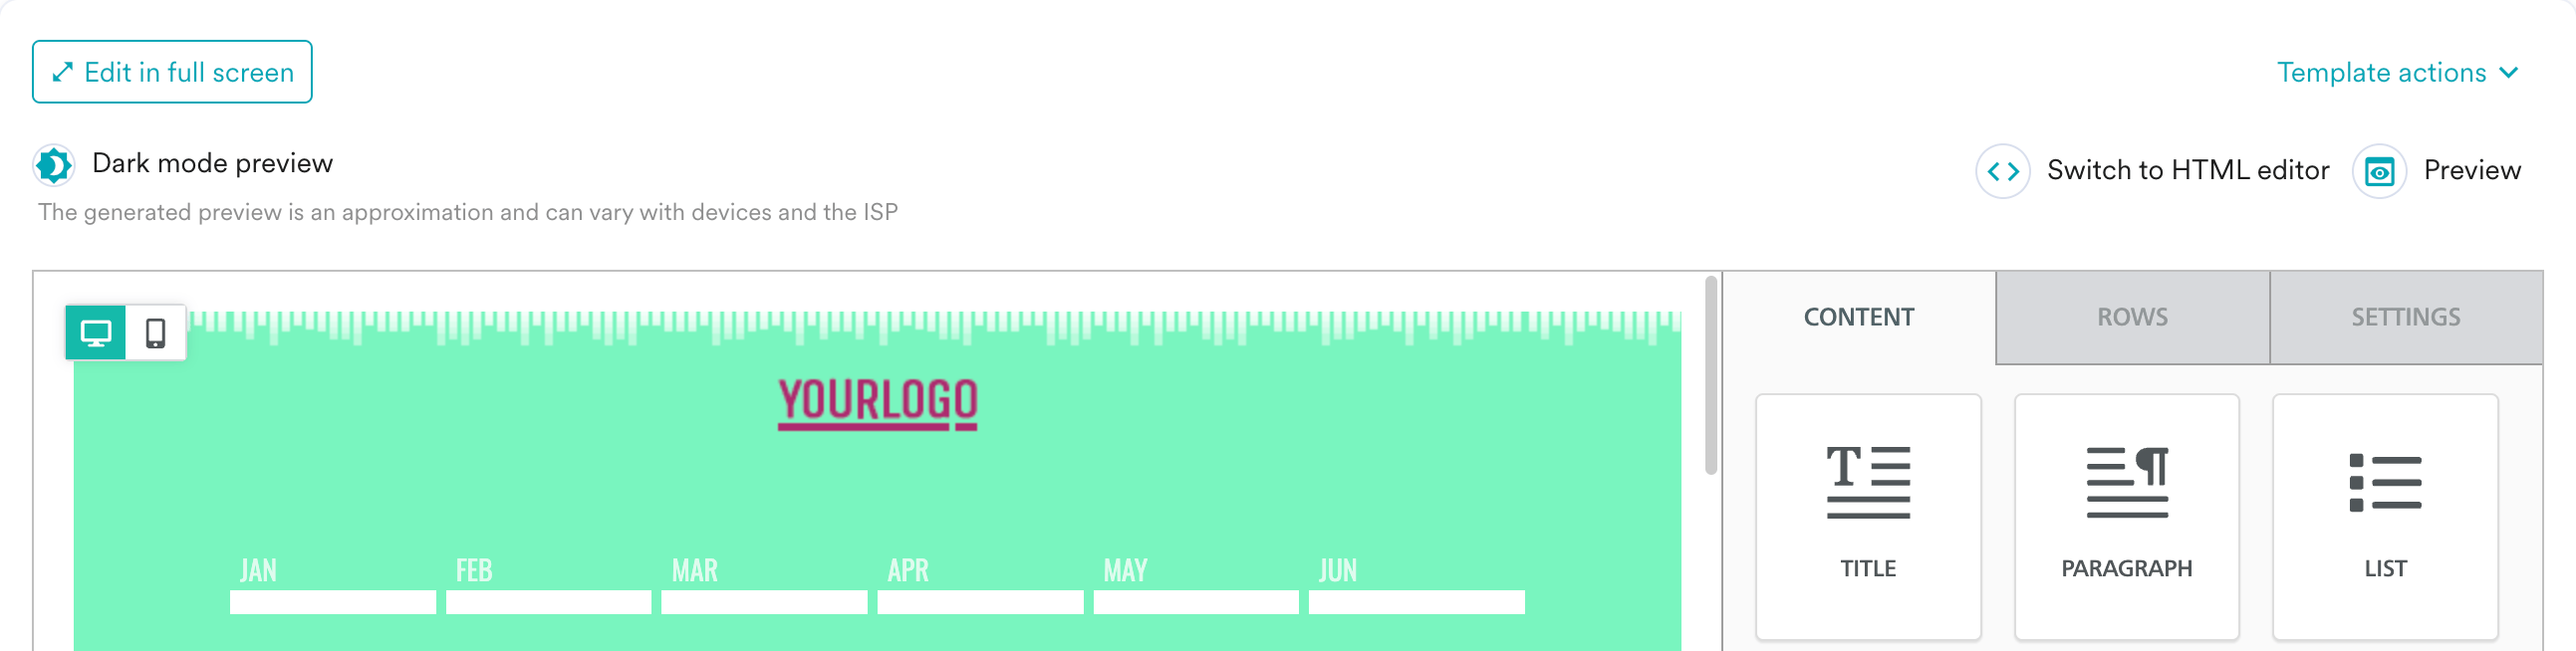
You have the following options available when you create content using the drag-and-drop editor:

* **Dark mode preview**This option allows you to preview your content in the dark mode. The generated preview is an approximation and can vary with devices and the ISP.
* **Switch to HTML editor**This option allows you to switch to the HTML editor and create content using it. Once switched, you cannot revert to the drag-and-drop editor. For more information, refer to [Edit/Paste HTML template](/user-guide/campaigns-and-channels/email/create/create-content-with-custom-html-editor).

<img src="https://mintcdn.com/moengage-unity-sdk-initialization-split/3hr5kc69qidG5GLA/images/moengage_9298df.png?fit=max&auto=format&n=3hr5kc69qidG5GLA&q=85&s=60de35d6f1532fa878efd6a7306a78db" alt="Screenshot 2024-09-18 at 2.54.54 PM.png" width="2586" height="654" data-path="images/moengage_9298df.png" />

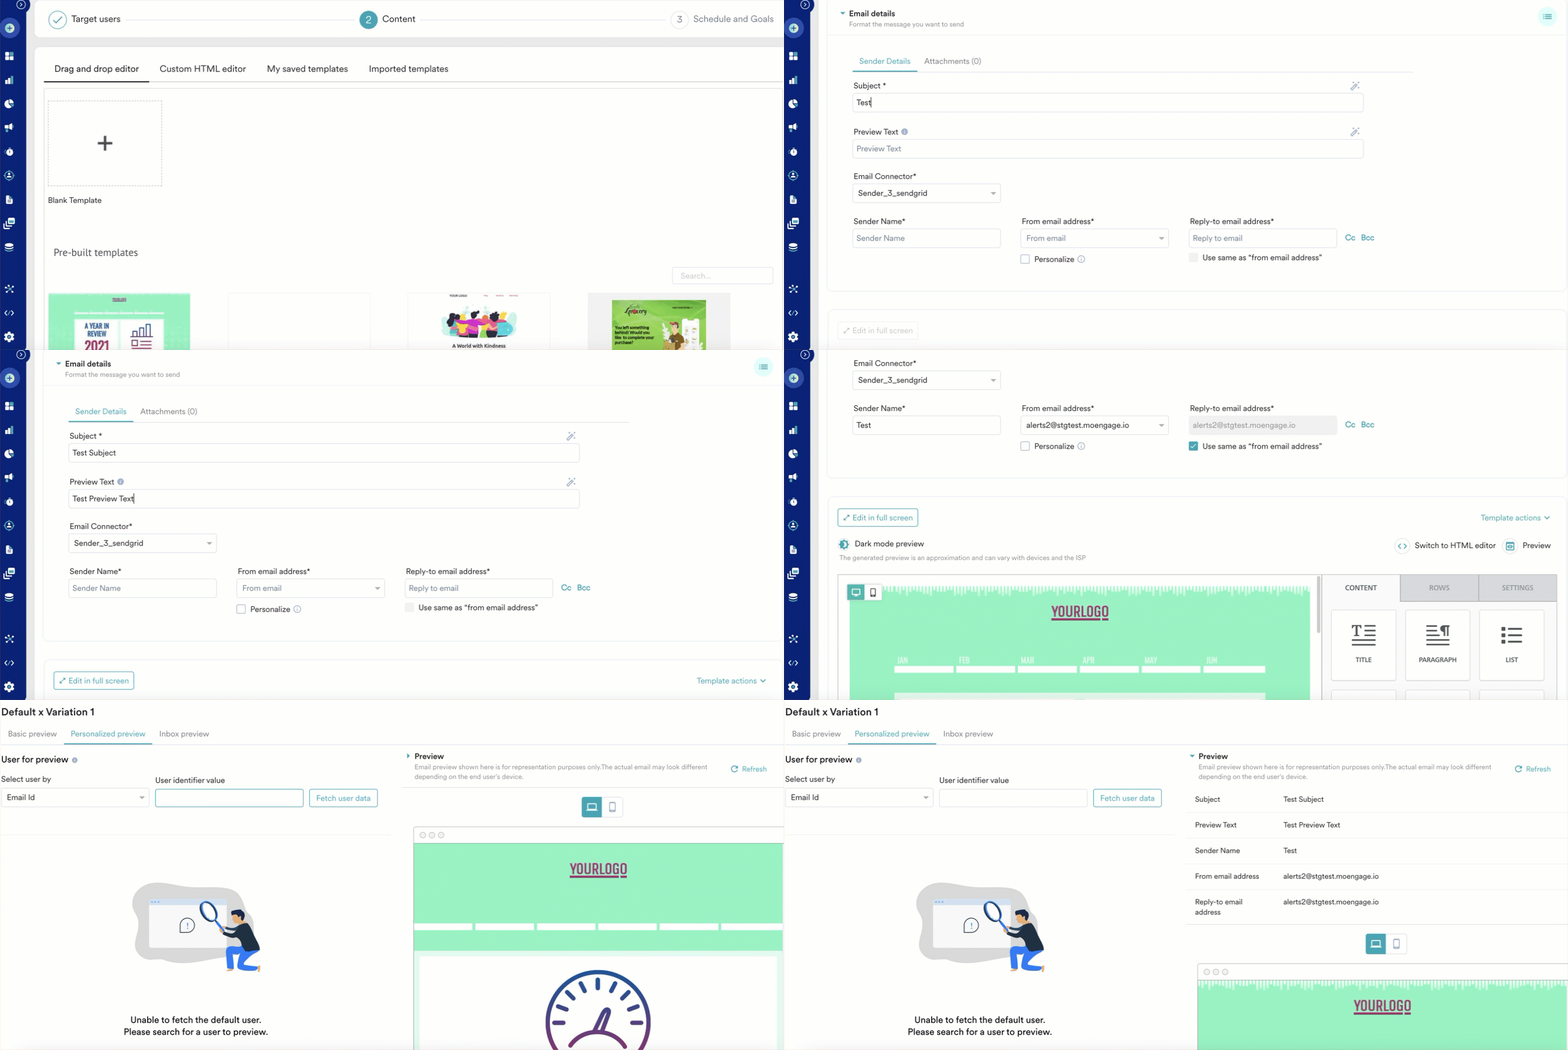
* **Preview**\
  This option allows you to preview the created content. You can preview the **Subject line**, **Preview text**, **Sender Name**, **From email address**, and **Reply-to email address**. <img src="https://mintcdn.com/moengage-unity-sdk-initialization-split/tsAE0HTwBq48nEDV/images/moengage_86e6b1.png?s=cbd8dfecbf386afc93d254fb2938cddc" alt="2024-09-13_12-47-23.gif" width="1374" height="614" data-path="images/moengage_86e6b1.png" />
# Properties Panel

The properties panel is divided into the following sections:

* [CONTENT](/user-guide/campaigns-and-channels/email/create/create-content-with-the-drag-and-drop-editor#content)
* [ROWS](/user-guide/campaigns-and-channels/email/create/create-content-with-the-drag-and-drop-editor#rows)
* [SETTINGS](https://moengage-user-guide.mintlify.app/user-guide/campaigns-and-channels/email/create/create-content-with-the-drag-and-drop-editor#settings)

# CONTENT

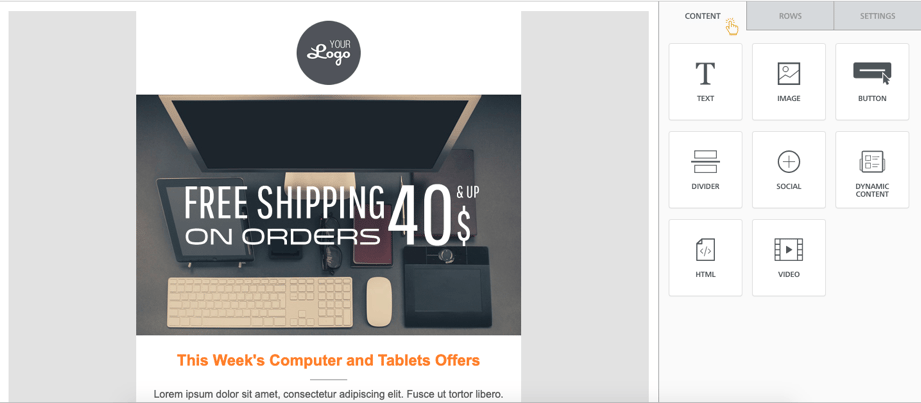
The **CONTENT** tab allows you to choose a new content element and add it to your message. Drag and drop a content element (a button, an image, a text tile, a transparent or solid divider, social media sharing) in the message area on the left.
<img src="https://mintcdn.com/moengage-unity-sdk-initialization-split/5pATfnQZWnbfz9Tn/images/moengage_effa1e.png?fit=max&auto=format&n=5pATfnQZWnbfz9Tn&q=85&s=b145361a21512f0851c534ba77bccdcf" alt="mceclip8.png" width="921" height="403" data-path="images/moengage_effa1e.png" />

## TEXT

## <img src="https://mintcdn.com/moengage-unity-sdk-initialization-split/JCklsy9f8YKzVPpW/images/moengage_013a65.png?fit=max&auto=format&n=JCklsy9f8YKzVPpW&q=85&s=ff06b6c537e0d7c62c9bb7ac8e5c99a9" alt="mceclip2.png" width="129" height="132" data-path="images/moengage_013a65.png" />

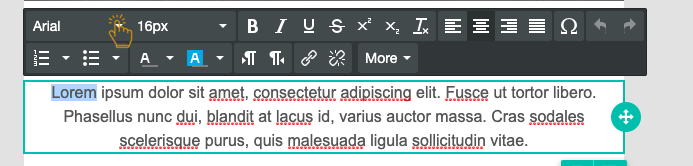
If you click inside a text content tile, the text editor toolbar appears directly on the editing stage. It gives you access to a number of text editing tools: font family, font size, basic formatting, text alignment, numbered and non-numbered bullets, font color, links.

<img src="https://mintcdn.com/moengage-unity-sdk-initialization-split/7I6Q9SBGr41ReRTp/images/moengage_b7982e.png?fit=max&auto=format&n=7I6Q9SBGr41ReRTp&q=85&s=e2583dd5f8ce91de97a8b9abfe843e14" alt="mceclip11.png" width="693" height="166" data-path="images/moengage_b7982e.png" />

<Info>
  If you set the font family to *Global Font*, it will inherit the font family selected under the **SETTINGS** tab. This allows you to change the font family for multiple elements at once by changing that property in the *SETTINGS* tab.
</Info>

### Add Links

Links can be added by selecting the text and clicking on the Insert/edit option:

<img src="https://mintcdn.com/moengage-unity-sdk-initialization-split/_mMLy2lSxSVbELUn/images/moengage_c65769.png?fit=max&auto=format&n=_mMLy2lSxSVbELUn&q=85&s=5aa288425e4742b9023f19e84d3ae407" alt="mceclip0.png" width="669" height="115" data-path="images/moengage_c65769.png" />

The 'Insert link' pop-up window is displayed which allows the user to give the link details:
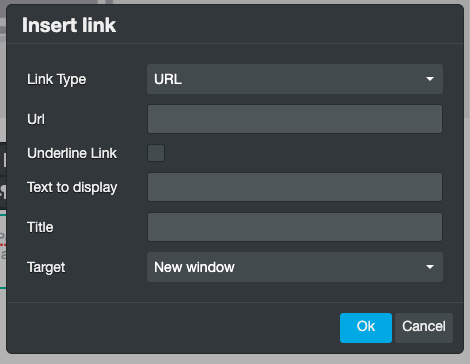
<img alt="mceclip2.png" src="https://mintcdn.com/moengage-unity-sdk-initialization-split/W8RnVpgMkET8xpID/images/moengage_ff6c53.png?fit=max&auto=format&n=W8RnVpgMkET8xpID&q=85&s=38452e86c04fc801bec31812dfaf9766" style={{ width:"63%" }} width="470" height="364" data-path="images/moengage_ff6c53.png" />

### Add Personalized Links

Personalized links can be added using the More >> Links. This will open a pop-up window where the user can access   and select from a list of personalized attributes (User profile attributes and Event attributes).
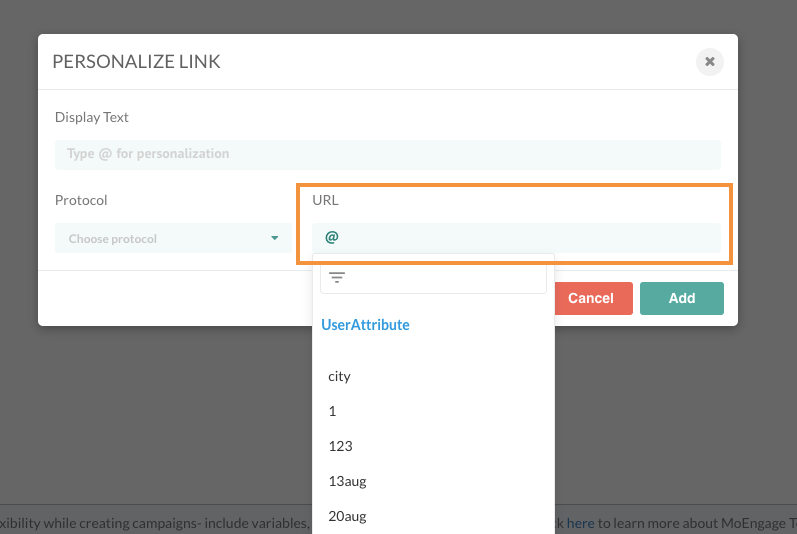
<img alt="personalised_links.png" src="https://mintcdn.com/moengage-unity-sdk-initialization-split/c_PVNxORKO4sQGDq/images/moengage_96f067.png?fit=max&auto=format&n=c_PVNxORKO4sQGDq&q=85&s=e9dc1ccecf6e09a022c1641804bcad1d" style={{ width:"60%" }} width="797" height="534" data-path="images/moengage_96f067.png" />

## IMAGE

<img alt="mceclip3.png" src="https://mintcdn.com/moengage-unity-sdk-initialization-split/W7uRAsIMAbhvTpo6/images/moengage_03b596.png?fit=max&auto=format&n=W7uRAsIMAbhvTpo6&q=85&s=2280e39767c1c64df68e0d6df33da50b" style={{ width:"27%" }} width="125" height="128" data-path="images/moengage_03b596.png" />

### How to Insert an Image?

Images can be inserted using the File manager. The editor includes a built-in file manager. The file manager is the component that you will use to browse, search, and select the images and documents that you wish to use in your email message. With the handy file manager you can:

* Browse, search, and sort existing files
* Switch between list and grid view
* Import new files
* Create new folders
* Preview and insert images into your message

### How Does It Look?

The file manager opens over the editor, covering the entire working area. This allows you to browse your files without worrying about your screen size or resolution.

The top section has actions and navigation helpers, with most of the space used to list your files and the information you need to work with them. By default, folders and images are shown in the *Grid view*. If you switch to *List view*, it will be used next time you open the File Manager. Here is an example of images within a folder, in the *Grid view*:
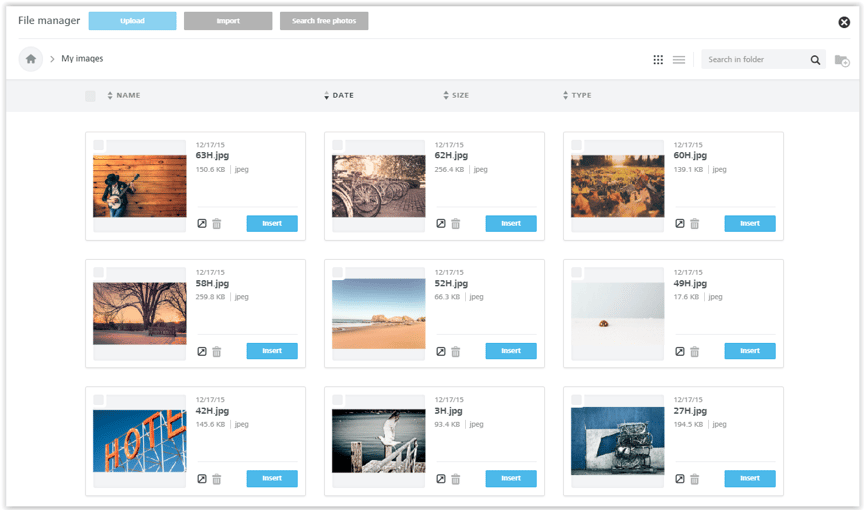
<img src="https://mintcdn.com/moengage-unity-sdk-initialization-split/lGL78K6d2VV03Hy7/images/moengage_8cd5a2.png?fit=max&auto=format&n=lGL78K6d2VV03Hy7&q=85&s=56755369225fa1a461ed67c5358d11c8" alt="Grid_View.png" width="864" height="510" data-path="images/moengage_8cd5a2.png" />

And here is the same folder, in the *List view*.
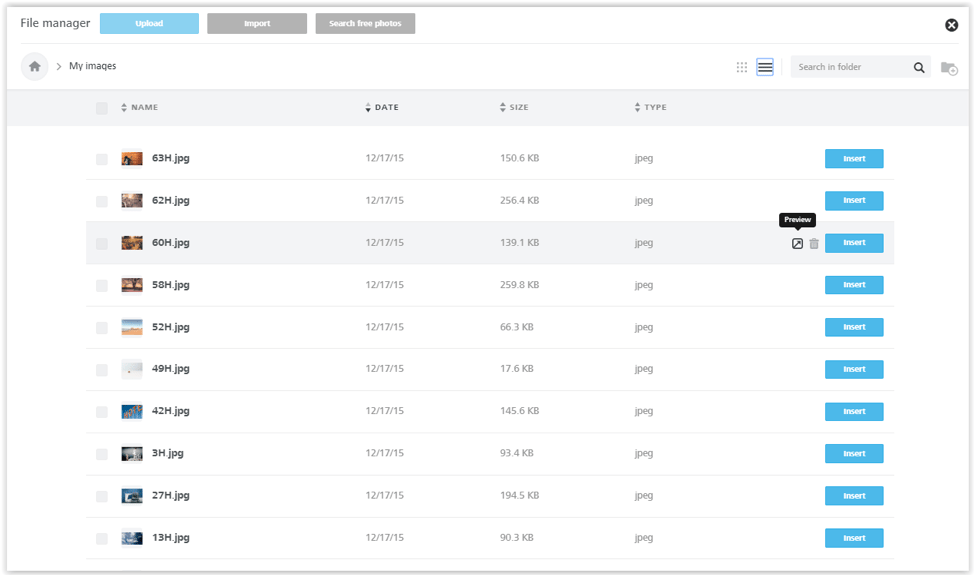
<img src="https://mintcdn.com/moengage-unity-sdk-initialization-split/z3l2URE0K8oVtPU3/images/moengage_f9b5bd.png?fit=max&auto=format&n=z3l2URE0K8oVtPU3&q=85&s=b7fb4ecd36852719291910f185164a29" alt="list_View.png" width="974" height="575" data-path="images/moengage_f9b5bd.png" />

### How to Access It?

The file manager will load in several scenarios.

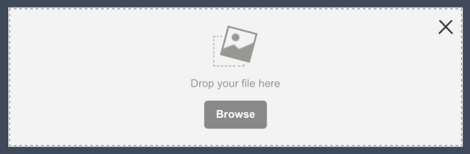
* When you click **Browse** in an image placeholder, which is displayed when you drag and drop an image content tile into a message. <img src="https://mintcdn.com/moengage-unity-sdk-initialization-split/TTRQNpctY9N8S3Xx/images/moengage_4d6dcd.png?fit=max&auto=format&n=TTRQNpctY9N8S3Xx&q=85&s=3e0004a860e59f5003faca59a35f3b44" alt="Browse.png" width="470" height="154" data-path="images/moengage_4d6dcd.png" />
* When you click **Change image** in the image properties panel: <img src="https://mintcdn.com/moengage-unity-sdk-initialization-split/d4cA3fqbzAaS1Beb/images/moengage_f292a7.png?fit=max&auto=format&n=d4cA3fqbzAaS1Beb&q=85&s=04d2715ac182d0bb9ce8edc40e3c9764" alt="Change_image.png" width="974" height="191" data-path="images/moengage_f292a7.png" />

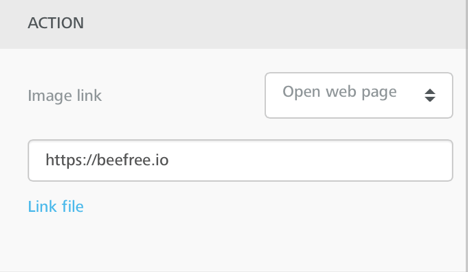
* When you click **Link file** when working with images and buttons: <img src="https://mintcdn.com/moengage-unity-sdk-initialization-split/Ct3koeavD-C_n9RD/images/moengage_d81930.png?fit=max&auto=format&n=Ct3koeavD-C_n9RD&q=85&s=4759b1f5a0af1d349709e7367ccc6f00" alt="link_file.png" width="468" height="272" data-path="images/moengage_d81930.png" />
### How to Upload Files?

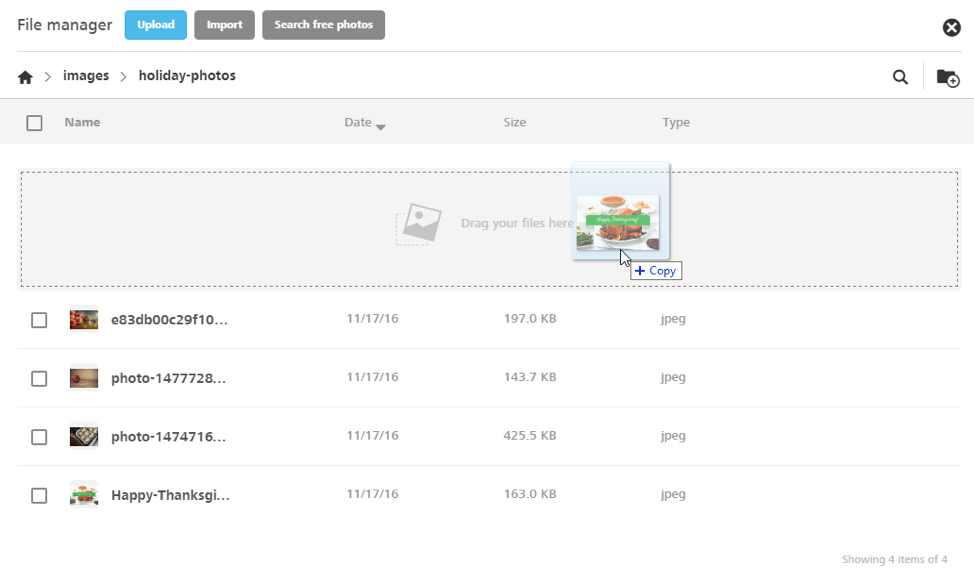
The quickest way to upload a file into the file manager is to drag it from your computer to the file manager window, dropping it anywhere on the page.
<img src="https://mintcdn.com/moengage-unity-sdk-initialization-split/kquucdzgqSjXMgOm/images/moengage_a83158.png?fit=max&auto=format&n=kquucdzgqSjXMgOm&q=85&s=348793e4c08ac36f77f0b4d9dcb00edd" alt="Upload_image.png" style={{ width:"50%" }} width="974" height="581" data-path="images/moengage_a83158.png" />

You can also

* Browse and upload from your computer using the **Upload**.
* Import from an external application using the **Import** button (see more below), if this feature has been enabled.
* Search and import free stock photos using the **Search free photos** button, if this feature has been enabled.

Note that the maximum allowed file size that can be uploaded is 5 MB.

### How to Import Files from Other Applications

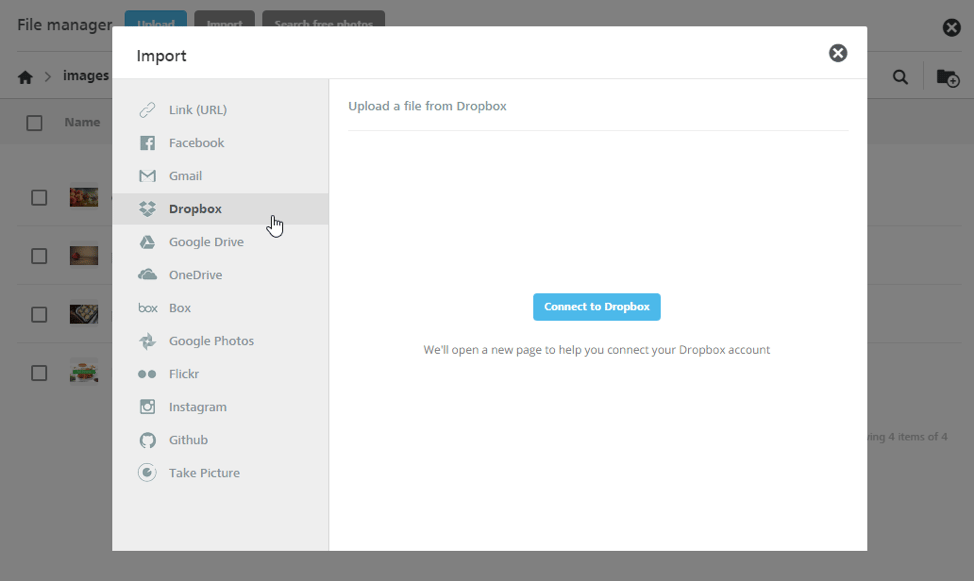
The ***Import*** feature allows you to connect external applications such as DropBox, Google Drive, Instagram, and more, and import your files.
<img src="https://mintcdn.com/moengage-unity-sdk-initialization-split/1dd6WS88301wLG4J/images/moengage_33671d.png?fit=max&auto=format&n=1dd6WS88301wLG4J&q=85&s=d3ec13217732eed88fe8e0f8f59f7de1" alt="Import_image.png" style={{ width:"68%" }} width="974" height="581" data-path="images/moengage_33671d.png" />

### How to Browse or Search Files

To locate your desired image or document, browse your folders and order their content by *name*, *date*, *size* or *type* by clicking the sort labels on top of the list.

An arrow icon next to this labels means that this is the current filter, and its orientation shows the order, ascending or descending.

Too many files in the selected folder? Click the *lens* icon to run a search. Results are filtered on the fly. Mind that this search is performed only in the current folder, and not in your entire repository.

### How to Use Files?

When you move your cursor over a file or folder, that row will be highlighted and the available action icons will be shown on the right side:

* *Preview* for files
* *Delete* for both files and folders

If an action is momentary not available, you are notified by the tooltip text of the icon, such as when you try to delete a folder that contains files, because only empty folders can be deleted.

If you want to delete multiple files or folders, use the check boxes to select them, the delete action is shown on top of the list. Only elements that can be deleted will have a selectable check box.

<img src="https://mintcdn.com/moengage-unity-sdk-initialization-split/l57Jshi6mIa6WTxy/images/moengage_2ded8b.png?fit=max&auto=format&n=l57Jshi6mIa6WTxy&q=85&s=d0f5b4895898fac543882614f2ddfce9" alt="preview.png" width="974" height="181" data-path="images/moengage_2ded8b.png" />

### How to Organise Folders?

You can create the folder structure you prefer to organise your files. To add new folders, use the *Add folder* icon.

For your folder names you can use letters (upper and lower case), numbers, spaces, periods (.), hyphens (-), or underscores (\_).

To navigate to the parent folder, use the top breadcrumb. Clicking the home icon takes you to your root folder.

### How Does the Image Editor Work?

#### Edit Images

The email editor includes an image editor that allows you to crop, rotate, resize, apply filters/frames, add stickers to any image, without leaving the editor.
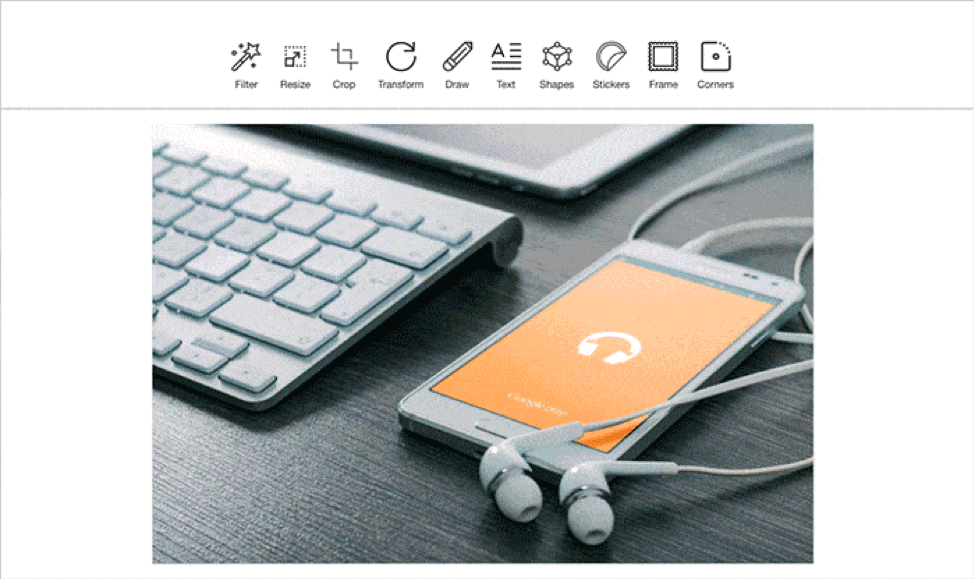
<img src="https://mintcdn.com/moengage-unity-sdk-initialization-split/5Ua6FGi-InVnkjHf/images/moengage_cf1dab.png?fit=max&auto=format&n=5Ua6FGi-InVnkjHf&q=85&s=52d2ebdddf1aafafbfefc921ff2a8214" alt="editing.png" style={{ width:"66%" }} width="974" height="579" data-path="images/moengage_cf1dab.png" />

#### Accessing the Image Editor

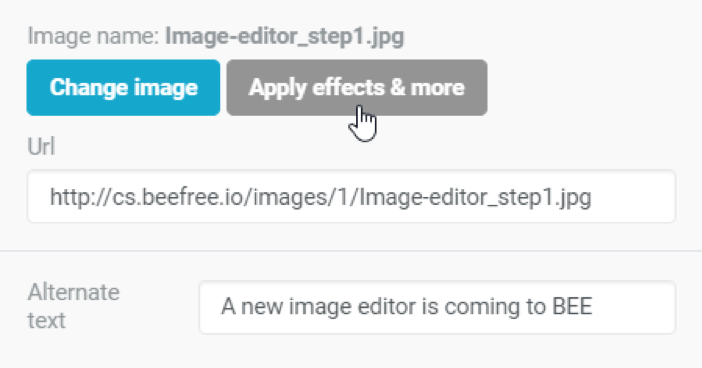
When you select an image in the editor, the **Apply effects & more** button is displayed. Click it to have access to a tool that allows you to edit the image in a variety of ways.
<img src="https://mintcdn.com/moengage-unity-sdk-initialization-split/lGL78K6d2VV03Hy7/images/moengage_8c266a.png?fit=max&auto=format&n=lGL78K6d2VV03Hy7&q=85&s=c4e9db0502d7f0841282589da20fcf91" alt="apply_effects.png" style={{ width:"60%" }} width="702" height="368" data-path="images/moengage_8c266a.png" />

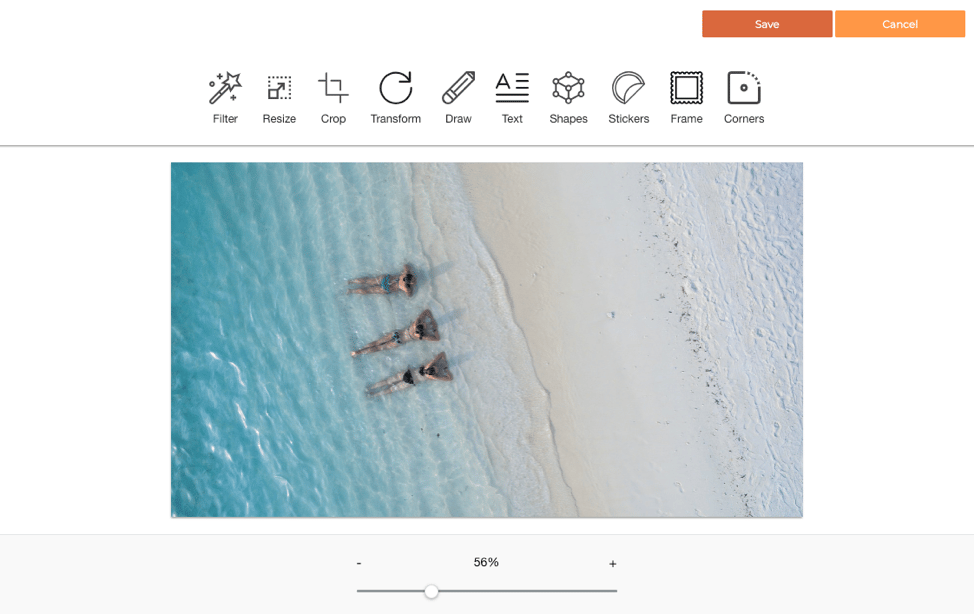
The editor has a lot of cool features, from filters to resizing and cropping tools.
<img src="https://mintcdn.com/moengage-unity-sdk-initialization-split/sHkmj9QWjSU59t_I/images/moengage_3ffb8c.png?fit=max&auto=format&n=sHkmj9QWjSU59t_I&q=85&s=bc2dbbb1c3fb6082f7e6d1274196d7d6" alt="editor_image.png" style={{ width:"57%" }} width="974" height="614" data-path="images/moengage_3ffb8c.png" />

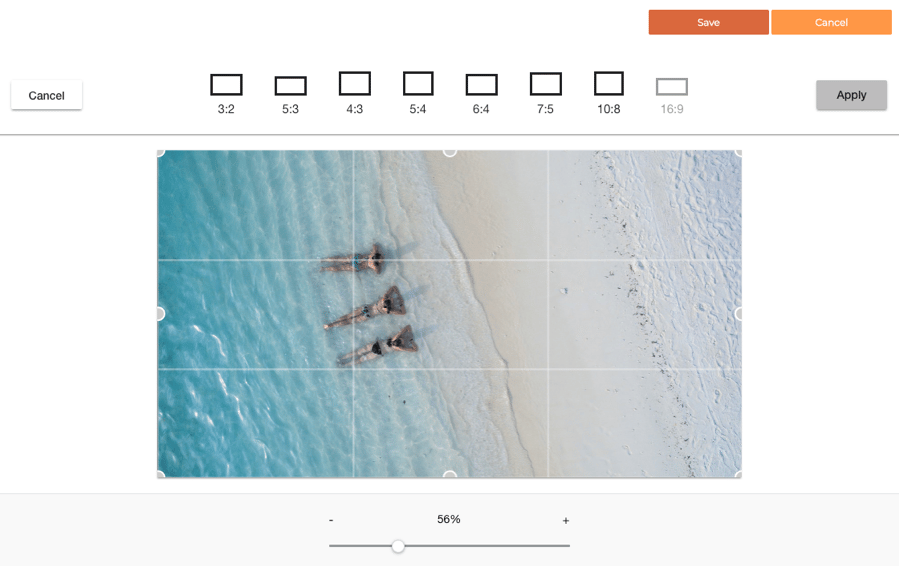
You can quickly and easily change the image size.
<img src="https://mintcdn.com/moengage-unity-sdk-initialization-split/x_1J63SbC40L-eCI/images/moengage_4edbe4.png?fit=max&auto=format&n=x_1J63SbC40L-eCI&q=85&s=1f08aeb4476d13ec12a937248245985e" alt="image_size.png" style={{ width:"57%" }} width="899" height="566" data-path="images/moengage_4edbe4.png" />

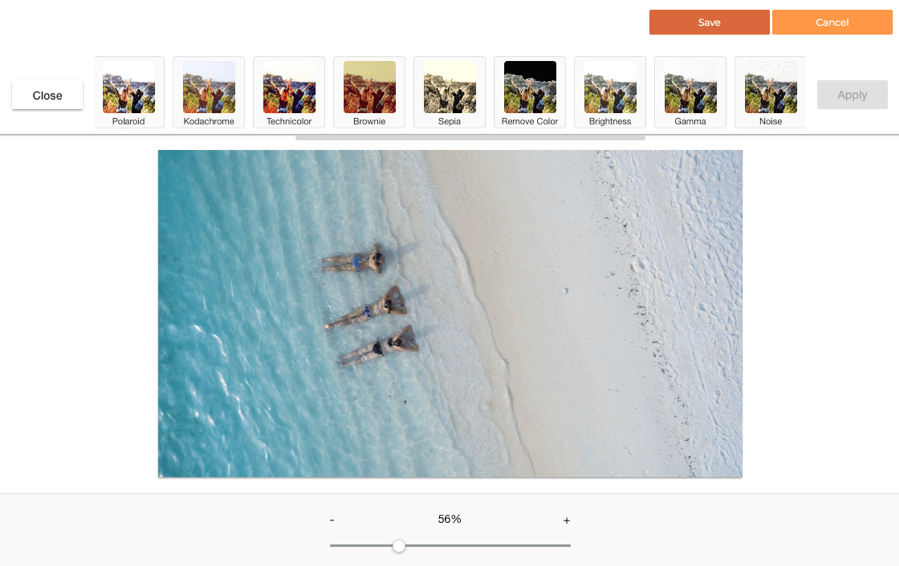
There are also a number of predefined filters that can help you very quickly change the look of the image.
<img src="https://mintcdn.com/moengage-unity-sdk-initialization-split/ciBkTWobPXcfvwtT/images/moengage_bf36b0.png?fit=max&auto=format&n=ciBkTWobPXcfvwtT&q=85&s=3667f34c3e50f21714fc9c1832bb90fe" alt="Filter.png" style={{ width:"59%" }} width="899" height="566" data-path="images/moengage_bf36b0.png" />

## CONTENT BLOCK

<img src="https://mintcdn.com/moengage-unity-sdk-initialization-split/VIRDnSlIWZ-NqOoJ/images/moengage_16b37a.png?fit=max&auto=format&n=VIRDnSlIWZ-NqOoJ&q=85&s=7ef14ad7c87a26d629acf031088ddf53" alt="Screenshot 2025-06-19 at 12.53.39 PM.png" style={{ width:"35%" }} width="240" height="268" data-path="images/moengage_16b37a.png" />

The Content Block tile helps you to add plain text and HTML content blocks to your email content using the drag & drop method. For more information, refer to [Content Blocks](/user-guide/content/content-blocks/content-blocks).

To add a content block, perform the following steps:

1. Drag & drop the content block tile into your email content.
2. Click **Add/Edit Content Block**.
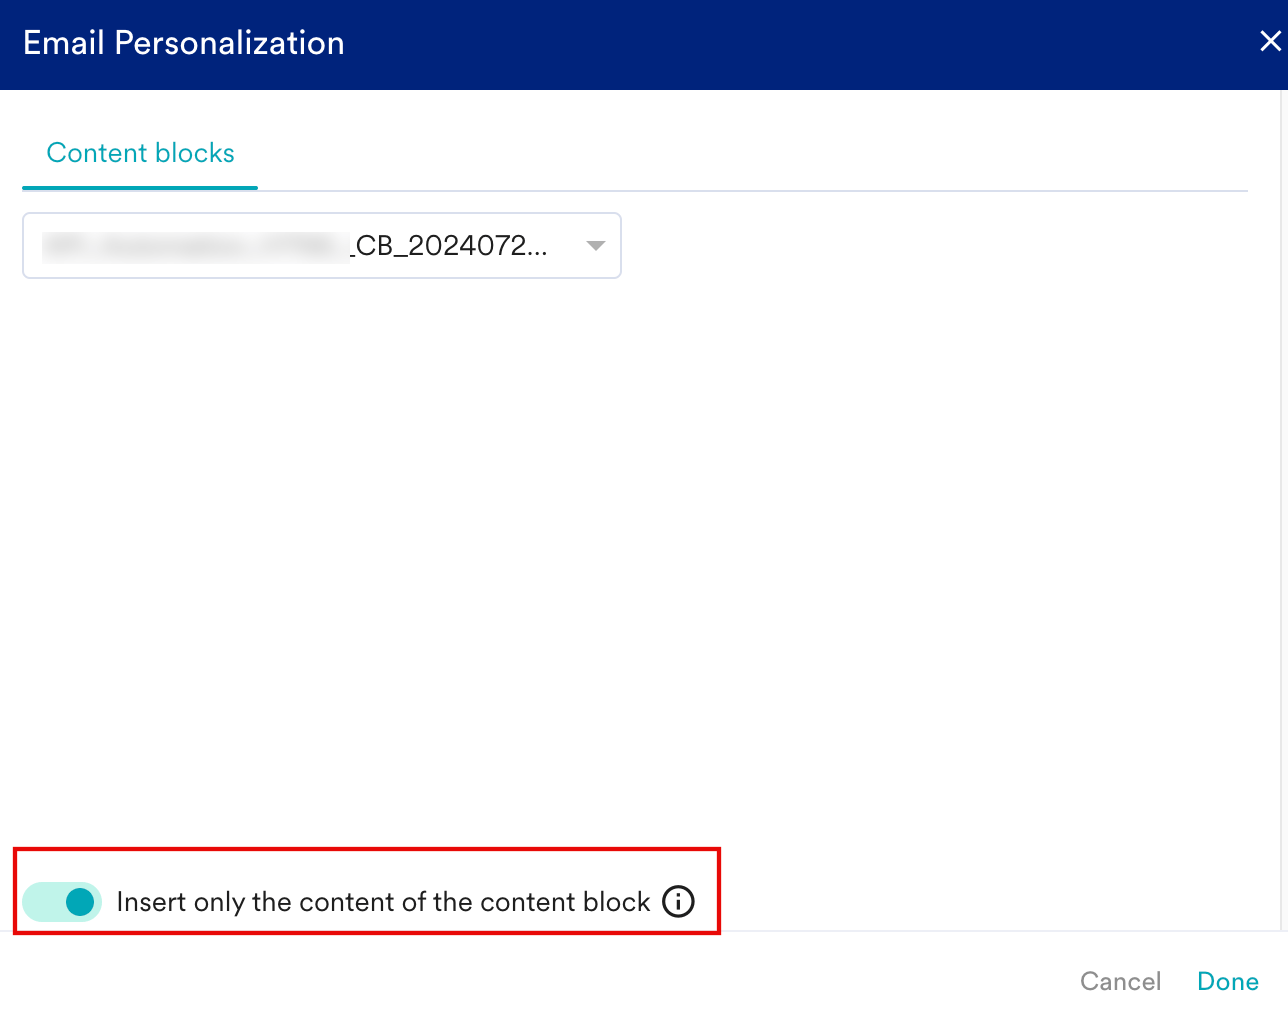
3. On the **Email Personalization** pop-up, search for the content block you want to add. When you add content blocks to an email campaign using the drag-and-drop method, MoEngage automatically updates the email content whenever you edit the source content block via the Content Block feature. However, if you want to add a content block without linking it to future edits, turn on the **Insert only the content of the content block** toggle. This action prevents automatic updates to the email content when you modify the original content block.
<img src="https://mintcdn.com/moengage-unity-sdk-initialization-split/IIwLuKGPjdbByE3q/images/moengage_77f2f7.png?fit=max&auto=format&n=IIwLuKGPjdbByE3q&q=85&s=6867a56e99b0b0cc5d5943e9cf787012" alt="content block toggle.png" style={{ width:"55%" }} width="1288" height="1020" data-path="images/moengage_77f2f7.png" />

## DYNAMIC CONTENT

<img src="https://mintcdn.com/moengage-unity-sdk-initialization-split/cCVRNbpzxfVeActK/images/moengage_7c58a8.png?fit=max&auto=format&n=cCVRNbpzxfVeActK&q=85&s=09e5577c5338e3c958b6873e448421af" alt="mceclip1.png" style={{ width:"31%" }} width="129" height="141" data-path="images/moengage_7c58a8.png" />

You can use the dynamic content tile to add a personalized image:

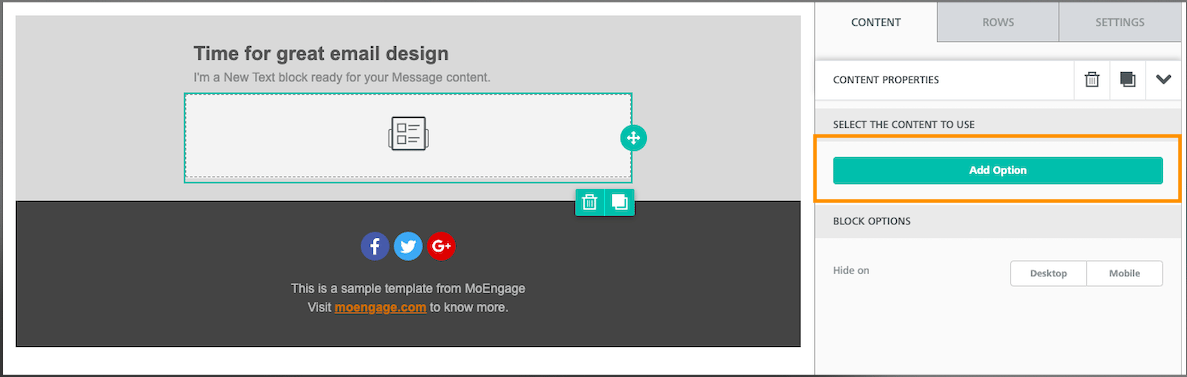
1. Select the dynamic content tile and click **Add Option**. <img src="https://mintcdn.com/moengage-unity-sdk-initialization-split/VIRDnSlIWZ-NqOoJ/images/moengage_178c5b.png?fit=max&auto=format&n=VIRDnSlIWZ-NqOoJ&q=85&s=6fc2b456fe7c0a7c277df4b2fd21e9b4" alt="mceclip6.png" width="1187" height="377" data-path="images/moengage_178c5b.png" />
2. Enter the details of the personalized image in the Personalized Content pop-up window. <img src="https://mintcdn.com/moengage-unity-sdk-initialization-split/XsvjH2PscmCt5gYl/images/moengage_0809d5.png?fit=max&auto=format&n=XsvjH2PscmCt5gYl&q=85&s=c86a897d2dc4455b154e622391aa7c4f" alt="mceclip7.png" width="810" height="563" data-path="images/moengage_0809d5.png" />
   1. Enter the personalized attribute in the **Image Source URL** field.
   2. Enter the target link in the **Target URL** field.
<Info>
  After a Dynamic Content tile is added, it cannot be edited or previewed in the WYSIWYG editor. You can delete an existing tile and create a new one in case of edits.
</Info>

## HTML

<img src="https://mintcdn.com/moengage-unity-sdk-initialization-split/7I6Q9SBGr41ReRTp/images/moengage_b5948f.png?fit=max&auto=format&n=7I6Q9SBGr41ReRTp&q=85&s=6a3651f97320bc09ac27bb4a92048b3d" alt="mceclip4.png" style={{ width:"31%" }} width="124" height="132" data-path="images/moengage_b5948f.png" />

The HTML tile allows you to add your HTML code to an email message that you are designing with the editor.

### How to Add an HTML Code?

To add your code, drag an HTML content element into your message. It can be positioned alone, with other HTML content items, or mixed with other types of content.

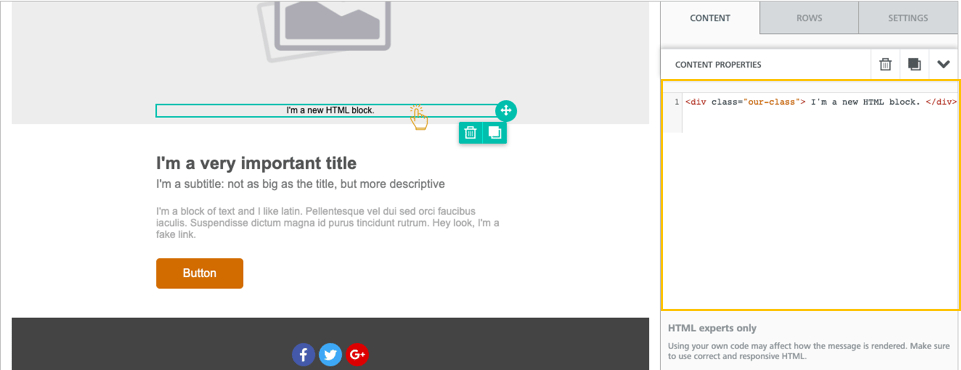
The newly-inserted content tile displays some default placeholder text. Click it and the right-side property panel displays the HTML code editing pane. You will find some placeholder code inside the editing area:
<img src="https://mintcdn.com/moengage-unity-sdk-initialization-split/VIRDnSlIWZ-NqOoJ/images/moengage_1a7989.png?fit=max&auto=format&n=VIRDnSlIWZ-NqOoJ&q=85&s=30513cc364e864dee564cc3095a97474" alt="mceclip12.png" style={{ width:"68%" }} width="961" height="370" data-path="images/moengage_1a7989.png" />

Paste your HTML code or write it directly in the editing area. The system highlights your syntax and indent your code to make it more readable.

**Note**: Using your code may affect how the message is rendered in email clients, preventing it from adjusting to the screen size (that is, the "responsiveness" of the message). Make sure to use HTML that is email compliant and responsive.

### Which HTML Tags Are Allowed?

The HTML content will automatically correct some issues like HTML tags that are left open, and strip out code that cannot be used, such as script tags or iframe tags (this code tags are not allowed by the major part of email clients, can cause deliverability problems or security risks).

#### List of Allowed Tags

`<a>`, `<abbr>`, `<acronym>`, `<address>`, `<area>`, `<b>`, `<bdo>`, `<big>`, `<blockquote>`, `<button>`, `<caption>`, `<center>`, `<cite>`, `<code>`, `<colgroup>`, `<dd>`, `<del>`, `<dfn>`, `<dir>`, `<div>`, `<dl>`, `<dt>`, `<em>`, `<fieldset>`, `<font>`, `<form>`, `<h1>`, `<h2>`, `<h3>`, `<h4>`, `<h5>`, `<h6>`, `<i>`, `<ins>`, `<kbd>`, `<label>`, `<legend>`, `<li>`, `<map>`, `<menu>`, `<ol>`, `<optgroup>`, `<option>`, `<p>`, `<pre>`, `<q>`, `<s>`, `<samp>`, `<select>`, `<small>`, `<span>`, `<strike>`, `<strong>`, `<sub>`, `<sup>`, `<table>`, `<tbody>`, `<td>`, `<textarea>`, `<tfoot>`, `<th>`, `<thead>`, `<u>`, `<tr>`, `<tt>`, `<u>`, `<ul>`, `<var>`

#### List of Allowed Attributes

| Tag                | Allowed Attributes                                      |
| ------------------ | ------------------------------------------------------- |
| `<a>`              | href, name, target                                      |
| `<img>`            | align, alt, border height, hspace, src, vspace, width   |
| `<table>`          | align, bgcolor, border, cellpadding, cellspacing, width |
| `<tbody>`          | align, valign                                           |
| `<td>`             | align, bgcolor, colspan, height, rowspan, valign, width |
| `<tr>`             | align, bgcolor, valign                                  |
| `<tfoot>`          | align, valign                                           |
| `<th>`             | align, bicolor, colspan, height, rowspan, valign, width |
| `<thead>`          | align,valign                                            |
| `<li>`             | type                                                    |
| `<map>`            | name                                                    |
| `<area>`           | alt, coords, href, shape, target                        |
| General Attributes | style, id, class, data-\*, title                        |

## VIDEO

<img src="https://mintcdn.com/moengage-unity-sdk-initialization-split/W7uRAsIMAbhvTpo6/images/moengage_02e5c4.png?fit=max&auto=format&n=W7uRAsIMAbhvTpo6&q=85&s=37b077146c4a24d662de6230d55f085f" alt="mceclip5.png" width="123" height="129" data-path="images/moengage_02e5c4.png" />

The video content tile allows you to share your video content in your emails. You need to copy and paste the URL of your video from YouTube or Vimeo, and the editor will do the rest: it will automatically grab the cover image for the video, overlay a Play icon on top of it, and link it to the video content.

The **Content properties** section prompts you to provide a video URL from YouTube or Vimeo, the popular video hosting services that we currently support. After you insert a valid URL, the content tile in the editing panel displays the cover image for the video with a Play icon overlaid on top of it. You can edit the type, color, and size of the Play icon to change the way it looks. Note that the editor cannot access password-protected videos to get the cover image.

<Info>
  * This feature does not embed the actual video in the email but rather links to it in a smart way.
  * The reason why the actual video content is not embedded into the message is that, it doesn't work very well. Many email clients do not support it.
  * Additionally, many emails are opened on mobile devices, and viewing videos on a mobile device can cause substantial data usage in addition to a poor user experience due to the quality of the data connection.
</Info>

## ICONS

<img src="https://mintcdn.com/moengage-unity-sdk-initialization-split/TTRQNpctY9N8S3Xx/images/moengage_4bf6da.png?fit=max&auto=format&n=TTRQNpctY9N8S3Xx&q=85&s=b78dc646355b65fa72e1d8cef2c177fb" alt="mceclip0.png" width="105" height="117" data-path="images/moengage_4bf6da.png" />

The Icons tile allows you to use small images and text together and thus provides more flexibility in your designs.

### How to Add an Icon Collection?

Click **Add new Icon** in the Content properties section of the editor sidebar to add the first icon for your collection. Then, click **Change image** to select an image from the file manager.

<img src="https://mintcdn.com/moengage-unity-sdk-initialization-split/G7H0GfgfjCPh_kkw/images/moengage_5e9b56.png?fit=max&auto=format&n=G7H0GfgfjCPh_kkw&q=85&s=585a8ce27907d00c9b271ee6e5f3c79a" alt="Add_Icon.png" style={{ width:"48%" }} width="754" height="1079" data-path="images/moengage_5e9b56.png" />

Click **More options** to create an accompanying section of text that you can position on the top, bottom, left, or right of the icon.

<img src="https://mintcdn.com/moengage-unity-sdk-initialization-split/c_PVNxORKO4sQGDq/images/moengage_958f66.png?fit=max&auto=format&n=c_PVNxORKO4sQGDq&q=85&s=ea51a1435cff2eebc0a33e01ffd53bde" alt="mceclip2.png" style={{ width:"41%" }} width="370" height="460" data-path="images/moengage_958f66.png" />

From this panel, you may also add a link for the icon and the image's alternate text. If you need to reorder the collection, drag the icon box in the content properties area.

For more design inspiration in using icons, visit the BEE editor blog post on [using icons in emails](https://emaildesign.beefree.io/email-icons-brand-inspiration-best-practices/).

## MENU

<img src="https://mintcdn.com/moengage-unity-sdk-initialization-split/sdP5LZ2stJJLCx89/images/moengage_a3f099.png?fit=max&auto=format&n=sdP5LZ2stJJLCx89&q=85&s=13cce1bcdce43dc01722bf74b79f38ee" alt="mceclip1.png" style={{ width:"41%" }} width="113" height="124" data-path="images/moengage_a3f099.png" />

The Menu tile allows you to add a text-based Navigation element.

Perform the following steps to add menu items:

1. Click **Add new item** in the Content properties section of the editor sidebar.
2. Define the properties for each element for the menu item. <img src="https://mintcdn.com/moengage-unity-sdk-initialization-split/z3l2URE0K8oVtPU3/images/moengage_f66dfa.png?fit=max&auto=format&n=z3l2URE0K8oVtPU3&q=85&s=2c8b1d7078c4b6e7583bfbd2b110e400" alt="mceclip3.png" width="372" height="385" data-path="images/moengage_f66dfa.png" />
3. You can also reorder menu items by dragging the icon found to the left of the menu item title.
4. You can also configure the menu item as a mobile menu. This option is only applicable for mobile devices and When turned on, a “hamburger” menu will be applied on mobile. It can be expanded with a tap to reveal menu items in a vertical layout. <img src="https://mintcdn.com/moengage-unity-sdk-initialization-split/Y04E6L6nVYTEHbLD/images/moengage_6f0f70.png?fit=max&auto=format&n=Y04E6L6nVYTEHbLD&q=85&s=67265d0231b9f59f4985033ae11bc695" alt="mceclip4.png" width="337" height="384" data-path="images/moengage_6f0f70.png" />

<Info>
  Mobile menus are not compatible with all email clients.
</Info>

For more information on how to use the Menu tile, visit the BEE editor article on [Adding Menu](https://support.beefree.io/hc/en-us/articles/25092783147154-A-Note-From-the-Beefree-Customer-Experience-Team).

# ROWS

The **ROWS** panel includes different types of structural elements for your message. They allow you to create different sections of the message.

<img src="https://mintcdn.com/moengage-unity-sdk-initialization-split/xumO7vMfbhlGPQKG/images/moengage_0ca54b.png?fit=max&auto=format&n=xumO7vMfbhlGPQKG&q=85&s=59cac27a13a484ac24278e1ee458f968" alt="mceclip4.png" width="468" height="292" data-path="images/moengage_0ca54b.png" />

Selecting a row will switch the properties panel to the row and column settings. The editor provides flexibility and customization at both the row and column levels.

<img src="https://mintcdn.com/moengage-unity-sdk-initialization-split/z3l2URE0K8oVtPU3/images/moengage_f6f868.png?fit=max&auto=format&n=z3l2URE0K8oVtPU3&q=85&s=7d401d3da7f1a1abe6d195da0ffc5317" alt="mceclip9.png" width="548" height="369" data-path="images/moengage_f6f868.png" />

## Save a Row

<Tabs>
  <Tab title="If Saving Row as Content Block is not enabled">
    This option allows you to save a row and reuse it in other templates. This option can be very handy while handling repetitive content, such as template headers or footers. To save a row, perform the following steps:

    <img alt="save_row_new.gif" src="https://mintcdn.com/moengage-unity-sdk-initialization-split/oaO_SRyrsReG7xue/images/save_row_new.gif?s=f2a378d348211f5a0891b4009eaf120c" width="1174" height="542" data-path="images/save_row_new.gif" />

    1. On the editor canvas, click to select the specific row you want to save.
    2. Click the Save (<Icon icon="floppy-disk" iconType="solid" />)icon.
    3. In the **Save Row** dialog box, perform the following:
       * Enter a unique **Row name**.
       * Select an existing category from the dropdown, or type a new name to [create a category](/user-guide/campaigns-and-channels/email/create/create-content-with-the-drag-and-drop-editor#create-a-new-category).
       * Click **Done**.
    4. After saving, you can easily find and reuse this row by navigating to the ROWS panel and selecting its assigned category.

    <Info>
      Multiple saved rows cannot have the same name. Saved rows need to have unique names.
    </Info>

    <Note>
      The following are Early Access features:

      * Create categories
      * Manage rows
      * Lock and unlock rows

      To enable it for your account, contact your MoEngage Customer Success Manager (CSM) or the Support team.
    </Note>

    ## Create Categories

    To easily organize and retrieve your saved rows, MoEngage supports categorizing your rows at the workspace level. All changes made to categories are updated in real-time across the workspace.

    * **Default Categories:** Every workspace includes three default categories: Header, Footer, and Promotional.
    * **Custom Categories:** You can create up to 7 custom categories (bringing the total limit to 10 categories per workspace).

    <Info>
      While users can create categories directly from the user interface, deleting a category through the MoEngage UI is not supported. To remove or delete a category from your workspace, raise a request with the MoEngage Support Team.
    </Info>

    ### Create a New Category

    <img alt="create_category_new.gif" src="https://mintcdn.com/moengage-unity-sdk-initialization-split/h9TDwxa3nSEqxALI/images/create_category_new.gif?s=20c6cc697d703e222bd810f609524e31" width="1152" height="540" data-path="images/create_category_new.gif" />

    You can create a new category dynamically either while saving a new row or while editing an existing one:

    1. On the **Save Row** dialog box, click into the category dropdown and type the desired name for your new category.
    2. Press the `Enter` key on your keyboard. The text string is transformed into a new, selectable custom category.
    3. Click **Done** to save both the row and the new category to the workspace simultaneously.

    After saving, you can view the categories in the **ROWS** tab. From the dropdown, select the required category to view the rows saved in that category.

    ## Manage Rows

    MoEngage allows you to edit and delete your saved rows directly from the Drag & Drop (D\&D) Editor. Any modifications you save happen in real-time and apply at the workspace level, making the updated design immediately available for all team members.

    <img alt="edit_delete_row.png" src="https://mintcdn.com/moengage-unity-sdk-initialization-split/6GjRPdzSWizoXNh9/images/edit_delete_row.png?fit=max&auto=format&n=6GjRPdzSWizoXNh9&q=85&s=61c0fe7ee45408238f59512c978c840a" width="500" data-path="images/edit_delete_row.png" />

    ### Edit a Row

    1. Navigate to the **ROWS** tab and select the desired category.
    2. All the rows under that category are displayed. Click the ellipsis icon on the row you wish to edit.
    3. Click **Edit row**.
    4. In the Edit row slide-out panel, you can:
       * Modify the row **Name**.
       * Reassign the row to a different **Category**. Alternatively, you can [create a new category](/user-guide/campaigns-and-channels/email/create/create-content-with-the-drag-and-drop-editor#create-a-new-category) directly from this field and reassign the row to it simultaneously.
       * Update the **Content** within the row itself.
    5. Click **Save changes**. The updated row will be instantly available in real-time for all users in the workspace to drag and drop.

    ### Delete a Row

    1. Navigate to the **ROWS** tab and select the desired category.
    2. All the rows under that category are displayed. Click the ellipsis icon on the row you wish to delete.
    3. Click **Delete**.
    4. In the Delete row confirmation box, click **Delete**. This action permanently removes the saved row from the workspace catalog.
       <Info> Deleting a row does not affect any existing campaigns (active, scheduled, paused, or stopped) that currently use it. When you add a row to an email, its content is copied into the campaign at that exact moment. Because there is no active link between the row and the campaign itself, your existing emails will continue to work exactly as designed. </Info>

    ## Lock and Unlock Rows

    For large teams and enterprises, locking rows helps preserve brand language and structural integrity by preventing unauthorized or accidental modifications to crucial structural elements (e.g., legally approved footers, global headers, or brand-specific banners).

    <img alt="lock_unlock.gif" src="https://mintcdn.com/moengage-unity-sdk-initialization-split/P4N_lGCM2-UW-hV1/images/lock_unlock.gif?s=ad73afbf6235ef5114b7542264c19659" width="1302" height="394" data-path="images/lock_unlock.gif" />

    Row locking permissions are governed by [role access settings](/user-guide/settings/account/team-management/access-roles) managed in the MoEngage **Content** permissions section:

    * **Admin and Manager**: Have **Lock/Unlock Row** capabilities by default.
    * **Developer, Analyst, and Marketer**: Do not have lock/unlock capabilities by default.
    * **Custom Roles**: Can manually assign lock/unlock privileges.

    <Info>
      - Granting a custom role the Lock/Unlock Row capability automatically forces the inheritance of View, Create, and Manage & Publish permissions for rows.
      - When browsing the ROWS tab, any locked row clearly displays a \[Locked] prefix in its name. This allows you to easily identify restricted rows at a glance so you can place them in the correct position within your email.
      - If your role does not have lock/unlock permissions, you cannot delete or modify a locked row once it has been added to the editor.
      - In addition to locking entire rows, you can lock individual row properties (such as background colors, padding, or text alignment). Only users with lock/unlock permissions can lock or unlock specific properties. Once a property is locked, it cannot be edited by users without the required access privileges.
    </Info>

    To lock or unlock a row:

    1. Select the row within the drag and drop editor.
    2. Navigate to **ROWS** > **ROW PROPERTIES**.
    3. Locate the lock configuration toggle:

    * **To lock the row:** Enable the toggle switch. When enabled, the row transitions to a **Locked** state.
    * **To unlock the row:** Disable the toggle switch. When disabled, the row returns to an **Unlocked** state.

    If you do not have lock/unlock permissions (such as a Marketer) and interact with a locked row:

    * You can drag, drop, and rearrange the row into your email design template.
    * You cannot edit, change properties, modify, or delete the content inside the row.
    * You cannot delete or modify a locked row once you have added it to the editor. To remove a locked row from the canvas, you must use the Undo button (located in the bottom-left corner of the editor).
    * If you attempt to click or edit inside the locked row, the editor will display a toast notification: `This module is locked by your team. Only members with "Lock/Unlock" permission can edit it. Contact your Manager or Admin to request edits.`
  </Tab>

  <Tab title="If Saving Row as Content Block is enabled ">
    <Note>
      This is an Early Access feature. To enable it for your account, contact your MoEngage Customer Success Manager (CSM) or the Support team.
    </Note>

    If you have the Content Block feature enabled, MoEngage allows you to save a row as a Content Block. When you save a row as an HTML Content Block, you can then add it to your future emails just like any other content block, and you can find it on the [Content Block](/user-guide/content/content-blocks/content-blocks) page within MoEngage. This functionality simplifies managing your email content by enabling easy editing and deletion of these saved rows.

    To save a row as a content block, perform the following steps:

    1. Select the row you want to save and click Save (<Icon icon="floppy-disk" iconType="solid" />).
    2. On the **Save content block** dialog box, enter the following details: <img src="https://mintcdn.com/moengage-unity-sdk-initialization-split/c_PVNxORKO4sQGDq/images/moengage_969423.png?fit=max&auto=format&n=c_PVNxORKO4sQGDq&q=85&s=5bc924334c9eb9f4e5cc2ad98fce5a5b" alt="Screenshot 2025-06-20 at 12.55.28 PM.png" width="400" data-path="images/moengage_969423.png" />
       * **Name**: Enter a name for your row to be saved as a content block.
       * **Description:** Enter description for your row.
       * **Tags:** Select the tags for your row. This helps in categorising your row based on the selected tags.
    3. Click **Save**.
  </Tab>
</Tabs>

## Create Rows with Product Set-Based Personalization

This option allows you to create rows with product blocks. A product block is a group of product attributes such as product image, product price, and so on. For more information, refer to [Personalize Content Using Recommendations](/user-guide/campaigns-and-channels/getting-started/message-personalization/personalize-content-using-recommendations).

<Info>
  The prerequisite for this feature is creating a Product set. Refer to this [link](/user-guide/content/recommendations/prerequisites) for more information.
</Info>

## Undo Widget

When enabled, the UNDO feature allows you to rewind and fast-forward to any point in your recent edit history. When changes are detected, a compact Undo widget displays in the bottom left corner of the stage (see annotation below):

<img src="https://mintcdn.com/moengage-unity-sdk-initialization-split/VIRDnSlIWZ-NqOoJ/images/moengage_1711a3.png?fit=max&auto=format&n=VIRDnSlIWZ-NqOoJ&q=85&s=c92fd1b129a564cef84b6df315e8dd42" alt="timeline.png" width="474" height="662" data-path="images/moengage_1711a3.png" />

## Timeline Widget

The timeline allows you to browse through the most recent changes. The widget displays:

* An icon to identify the content element type (an image, text, and so on)
* A description of what changed, giving the new property value (if any)
* The exact time it happened

These details help determine what modification was applied and allow the user to reset to an earlier version of the message.

The Undo widget currently displays the last 15 edits in the timeline, but you can always rewind to the Message Opened state to undo all changes since the message was initially opened in the editor.

## Hide Content on Desktop or Mobile

**Hide on** feature is available for both the content level and the row level. You can now hide individual content tiles or entire rows from a specific type of device.

For example:

| Content displayed on desktop                                                                                                                                                                                                                                                                                                                                                                                                                                                                                                                                                                                                                                                                                                                                                                                                                                                                                                                                                                                                                                                                                                                                                                                                                                                                                                                                                                                                                                                                                                                                                                            | Content displayed on mobile                                                                                                                                                                                                                                                                                                                                                                                                                                                                                                                                                                                                                                                                                                                                                                                                                                                                                                                                                                                                                                                                                                                                                                                                                                                                                                                                                                                                                                                                                                                                                                         |
| ------------------------------------------------------------------------------------------------------------------------------------------------------------------------------------------------------------------------------------------------------------------------------------------------------------------------------------------------------------------------------------------------------------------------------------------------------------------------------------------------------------------------------------------------------------------------------------------------------------------------------------------------------------------------------------------------------------------------------------------------------------------------------------------------------------------------------------------------------------------------------------------------------------------------------------------------------------------------------------------------------------------------------------------------------------------------------------------------------------------------------------------------------------------------------------------------------------------------------------------------------------------------------------------------------------------------------------------------------------------------------------------------------------------------------------------------------------------------------------------------------------------------------------------------------------------------------------------------------- | --------------------------------------------------------------------------------------------------------------------------------------------------------------------------------------------------------------------------------------------------------------------------------------------------------------------------------------------------------------------------------------------------------------------------------------------------------------------------------------------------------------------------------------------------------------------------------------------------------------------------------------------------------------------------------------------------------------------------------------------------------------------------------------------------------------------------------------------------------------------------------------------------------------------------------------------------------------------------------------------------------------------------------------------------------------------------------------------------------------------------------------------------------------------------------------------------------------------------------------------------------------------------------------------------------------------------------------------------------------------------------------------------------------------------------------------------------------------------------------------------------------------------------------------------------------------------------------------------- |
| <img alt="HideContent01.png" src="https://mintcdn.com/moengage-unity-sdk-initialization-split/se23H5LCdc3Myyzz/images/moengage_ad60b0.png?fit=max&auto=format&n=se23H5LCdc3Myyzz&q=85&s=b6b0ff2d4d5c6599ee6695a1ee23123e" width="740" height="744" data-path="images/moengage_ad60b0.png" /> | <img alt="HideContent02.png" src="https://mintcdn.com/moengage-unity-sdk-initialization-split/InM6ajtGzAbUJS-q/images/moengage_62012f.png?fit=max&auto=format&n=InM6ajtGzAbUJS-q&q=85&s=39480efa6388bb58a5ce12668af85a7f" width="64" height="52" data-path="images/moengage_62012f.png" /> |

Do the following:

1. Navigate to Property Panel.
2. Scroll down to **Block options** settings <img src="https://mintcdn.com/moengage-unity-sdk-initialization-split/flsfKRmnPSS_x9X3/images/moengage_48792a.png?fit=max&auto=format&n=flsfKRmnPSS_x9X3&q=85&s=13dd8ae92b1962de73b9b5c642586247" alt="image5.png" width="1999" height="385" data-path="images/moengage_48792a.png" />
3. In **Hide on**, select Desktop or Mobile. <img src="https://mintcdn.com/moengage-unity-sdk-initialization-split/7I6Q9SBGr41ReRTp/images/moengage_b54cdb.png?fit=max&auto=format&n=7I6Q9SBGr41ReRTp&q=85&s=6dea517ac064b62eee860c8c805251ce" alt="image9.png" width="1999" height="412" data-path="images/moengage_b54cdb.png" />

You can check the result by navigating to the Preview and selecting the Mobile view.

## Hide Rows

To hide a larger portion of your design, hide an entire row instead.

1. Select the row you want to hide.
2. Navigate to **Row Properties**.
3. In **Hide on**, select Desktop or Mobile.

<img src="https://mintcdn.com/moengage-unity-sdk-initialization-split/sdP5LZ2stJJLCx89/images/moengage_a7e125.png?fit=max&auto=format&n=sdP5LZ2stJJLCx89&q=85&s=f9db2bc4fe68ae65e27019902b08800a" alt="image11.png" width="1913" height="553" data-path="images/moengage_a7e125.png" />

# SETTINGS

From the **SETTINGS** tab, you can modify general settings that apply to the entire message:

* **Content area width**: This is the width of the area where content tiles are dropped. According to email marketing best practices, it should typically be set to 600px or less. Note that this is the maximum width that will be used on larger devices. When the device’s screen is smaller, the message will adjust automatically to it.
* **Background color**: It is the background color for the message. This setting is effective only for rows (and columns) where color has not been specified. Otherwise, the background color specified for that content structure will be used.
* **Content area background color**: It is the background color for the content area. This setting is effective only for rows and columns where color has not been specified.
* **Default font**: It is the default font that will be used when another font family has not been specified. This setting affects all text set to use the **global font**.
* **Link color**: It is the link color. As above, this setting affects all text links set to use the default color.

<img src="https://mintcdn.com/moengage-unity-sdk-initialization-split/aMQNgnBcE5JNk3XO/images/moengage_685267.png?fit=max&auto=format&n=aMQNgnBcE5JNk3XO&q=85&s=c6a683f6217fdc433769433ef6c7d0d0" alt="mceclip10.png" width="784" height="430" data-path="images/moengage_685267.png" />